
If you’ve ever wished you could go back and play your favorite PlayStation 2 games without digging out your old console, you’re not alone.
Many classic titles are still loved today—but getting them to run on a modern PC can feel confusing at first. That’s where PCSX2 comes in.
PCSX2 Emulators make it possible to run PS2 games directly on your computer, often with better graphics and smoother performance than the original console. But here’s the part most people struggle with: adding games correctly.
You might install the emulator, open it, and… nothing shows up. No games, no clear instructions—just confusion.
This guide is here to fix that. In the simplest way possible, you’ll learn how to set up PCSX2, use the required PCSX2 bios, and most importantly, how to properly add and manage your PCSX2 games so they actually appear and run.
Whether you’re completely new or just stuck on one step, this article will walk you through everything in a clear and practical way.
- 1 What Is PCSX2 Emulator?
- 2 Minimum PC System Requirements
- 3 How To Install PCSX2 (Step-by-Step)
- 4 How To Add Games To PCSX2
- 5 Where to Put Game Files?
- 6 PCSX2 Supported Game Formats
- 7 Basic Settings for Better Performance
- 8 Common Problems and Fixes
- 9 Advanced Tip: Different Settings for Each Game
- 10 FAQs – How To Add Games To PCSX2
- 11 Conclusion
What Is PCSX2 Emulator?
PCSX2 is a PlayStation 2 emulator that allows you to play PS2 games on your computer. Instead of using a physical console, the emulator recreates the PS2 environment on your PC.
With PCSX2 Emulators, you can improve graphics quality, use save states, and even play games in higher resolutions than the original console supported. This makes old games look and feel better on modern systems.
To run games, the emulator requires something called a PCSX2 bios. This is an essential file that acts like the system software of a real PS2. Without it, the emulator will not work.
Minimum PC System Requirements
Before installing PCSX2 Emulators, it’s important to make sure your computer can handle it. Emulation can be demanding, especially for PS2 games.
Here are the basic minimum requirements:
- CPU: Dual-core processor (Intel or AMD)
- RAM: At least 4 GB
- GPU: DirectX 11 compatible graphics card
- Storage: 10–20 GB free space (for emulator + games)
- Operating System: Windows 10/11, Linux, or macOS
For better performance, especially with heavier PCSX2 games, a stronger CPU and GPU are recommended. The CPU matters more than the GPU in most cases.
How To Install PCSX2 (Step-by-Step)
Setting up PCSX2 is simple if you follow the correct steps. Here’s a clear and slightly more detailed guide to help you get started without confusion:
Step 1: Download PCSX2
Go to the official PCSX2 website and download the latest version (stable or nightly build).
Make sure you choose the correct version for your operating system (Windows, Linux, or macOS).
Step 2: Install or Extract
If you downloaded the installer, run it and follow the on-screen instructions to install the emulator.
For portable versions, extract the ZIP file into a folder where you want to keep PCSX2.
Step 3: Launch Setup Wizard
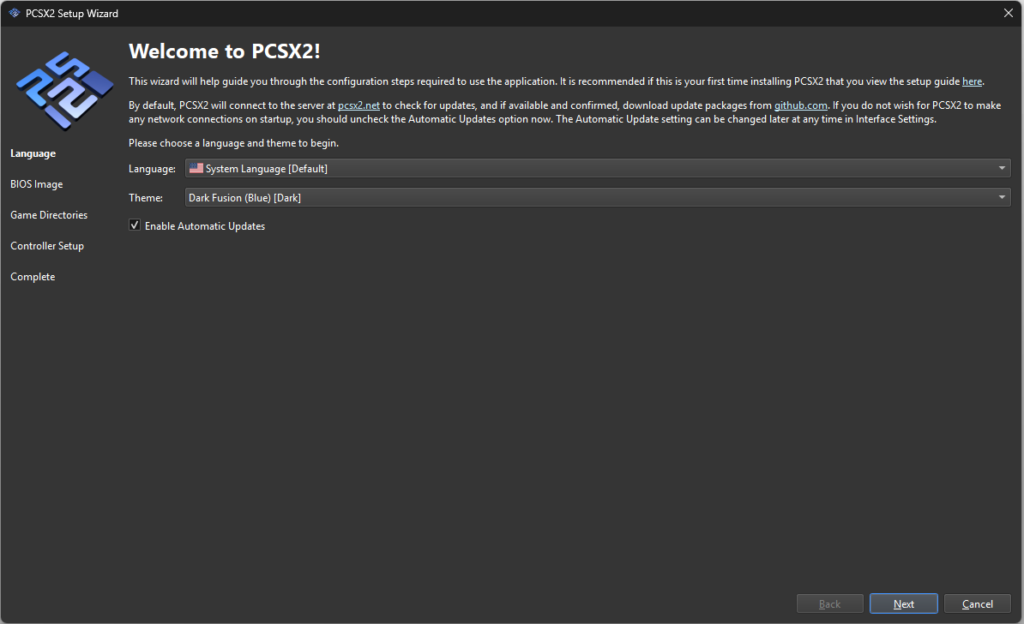
Open PCSX2, and the first-time setup wizard will appear automatically.
Select your language and leave most settings as default unless you understand advanced options.
Step 4: Add PCSX2 BIOS
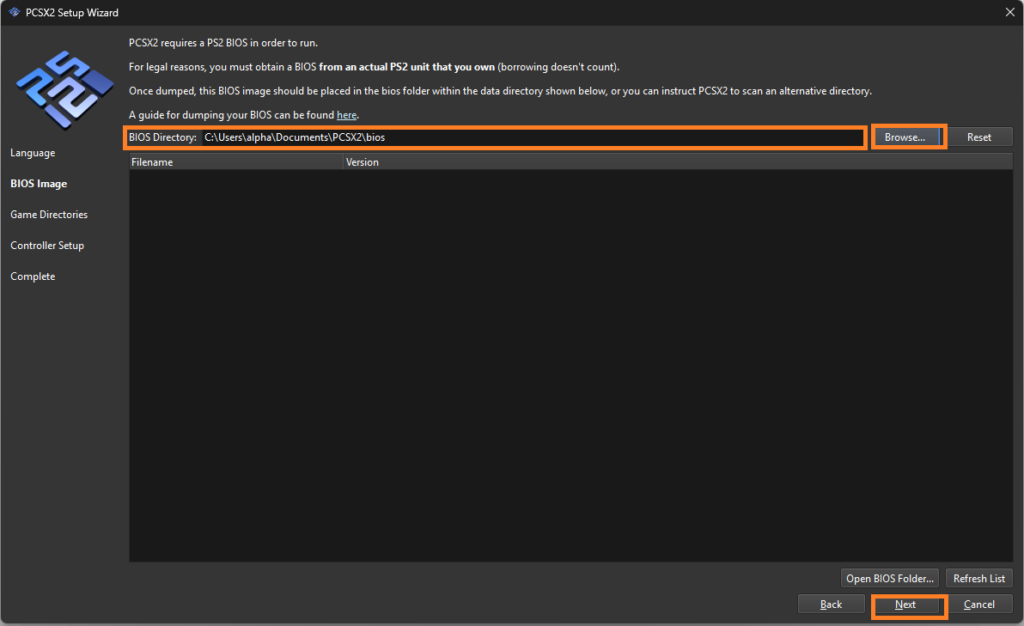

Click on “Browse” and select the folder where your PCSX2 bios files are stored.
Once selected, choose a BIOS from the list, this step is required to run any games.
Step 5: Finish Setup
Complete the setup wizard and open the main PCSX2 interface.
Your emulator is now ready, and you can move on to adding your PCSX2 games.
How To Add Games To PCSX2
Once you have installed PCSX2, the next important step is adding your games so they appear in the emulator. Many users get stuck here, but if you follow these steps carefully, it becomes very easy.
Step 1: Open PCSX2
Launch the PCSX2 emulator from your desktop or installation folder.
Wait for the main screen to load completely before moving to the next step.
Step 2: Go to Game List Settings
Look for the option like “Add Game Directory” or open the Game List settings from the menu.
This section allows PCSX2 to scan and display your PCSX2 games.
Step 3: Select Your Game Folder
Click on Browse and navigate to the folder where your game files (ISO) are stored.
Select the folder (not individual files) so PCSX2 can detect all games inside it.
Step 4: Let PCSX2 Scan Games
After selecting the folder, PCSX2 will automatically scan and list your games.
This may take a few seconds depending on how many PCSX2 games you have.
Step 5: Refresh if Games Don’t Appear
If your games are not visible, click on Refresh or Rescan in the game list section.
This forces the emulator to recheck the folder and detect missing games.
Step 6: Start Playing
Once your games appear, simply double-click on any game to launch it.
PCSX2 will use your PCSX2 bios and current settings to run the game.
Following these steps ensures your games are properly added and ready to play in PCSX2 Emulators without any confusion.
You might also like : PCSX2 Setup Guide
Where to Put Game Files?
To avoid confusion, it’s best to keep all your games in one organized folder. For example, you can create a folder named:
Documents > PCSX2 GamesPlace all your ISO files inside this folder. Then, when adding a game directory in PCSX2, simply select this folder.
Keeping your PCSX2 games in one place makes it easier for the emulator to scan and manage them. It also helps avoid missing files or duplicate entries.
PCSX2 Supported Game Formats
PCSX2 supports several file formats, but some work better than others. The most recommended format is:
- ISO (Best and most stable)
Other supported formats include:
- BIN/CUE
- CHD (compressed format)
Using ISO files is the safest choice because they are easy to load and have fewer compatibility issues. If your game is in another format, you may need to convert it.
Basic Settings for Better Performance
After adding your games, you may want to adjust a few settings for smoother gameplay. These settings can make a big difference.
In the graphics settings:
- Choose Vulkan or DirectX renderer
- Set resolution scaling (2x or 3x for better visuals)
In performance settings:
- Enable speed hacks if needed
- Adjust settings based on your PC power
Every game behaves differently, so you might need to test and adjust settings for the best experience.
Common Problems and Fixes
Even after setting up everything correctly, you may face some small issues while using PCSX2 Emulators. Don’t worry—most of these problems are common and easy to fix if you follow the right steps.
1. Games Not Showing in the List
Make sure you added the correct folder in “Add Game Directory” and not an empty or wrong location.
Click Refresh/Rescan so PCSX2 can detect all available PCSX2 games again.
2. Game Not Starting
Check if your PCSX2 bios is properly selected during setup; without it, games won’t run.
Also confirm your game file is not corrupted and is in a supported format like ISO.
3. Slow Performance or Lag
Lower the resolution scaling in graphics settings to reduce load on your PC.
Enable speed hacks carefully, as they can improve FPS but may affect stability.
4. Black Screen or Game Crash
Switch between different renderers like Vulkan, DirectX, or OpenGL in graphics settings.
Some PCSX2 games need specific settings, so try changing them one at a time.
5. Controller Not Working
Go to controller settings and remap your keys or reconnect your gamepad.
Make sure your controller is detected by your system before opening PCSX2.
6. PCSX2 Not Closing Properly
Sometimes pressing ESC only closes the game, not the emulator itself.
You may need to close PCSX2 manually or use proper exit settings/scripts for full closure.
Advanced Tip: Different Settings for Each Game
Some PCSX2 games work better with different settings. Instead of using one global setup, you can create separate configurations for each game.
This can be done using custom config folders and command-line options like:
--cfgpath=folder_nameThis allows each game to have its own settings, which improves compatibility and performance.
FAQs – How To Add Games To PCSX2
How do I add files to PCSX2?
To add files to PCSX2, you need to point the emulator to the folder where your game files are stored. Open PCSX2, go to the game list section, and click on “Add Game Directory.” Then select the folder that contains your PCSX2 games (usually ISO files).
Once added, PCSX2 will automatically scan and display the games. If nothing appears, just click Refresh/Rescan to update the list.
How do I add a game directory to PCSX2?
Adding a game directory in PCSX2 is simple and important. Open the emulator and look for the option called “Add Game Directory” or go into settings and find the Game List section.
Click Browse, select the folder where your games are saved, and confirm. PCSX2 will scan that folder and show all detected PCSX2 games in the main screen.
How to add covers to games on PCSX2?
Game covers in PCSX2 usually appear automatically if the emulator can detect them. Make sure your games are properly named and stored in a clean folder so PCSX2 can fetch cover images.
If covers don’t show, you can manually add images by placing them in the correct covers/artwork folder inside PCSX2’s directory. This helps organize your PCSX2 games visually.
How to upload games on PCSX2?
You don’t actually “upload” games into PCSX2 Emulators like an app store. Instead, you load or add games from your computer storage.
Simply store your game files in a folder, then use Add Game Directory in PCSX2 to scan and display them. After that, you can launch any game directly from the list.
How to add games to PCSX2 Mac?
On macOS, the process is almost the same as Windows. Open PCSX2, go to the game list settings, and select Add Game Directory.
Choose the folder where your PCSX2 games are stored. After scanning, your games will appear, and you can double-click to start playing.
How to insert game in PCSX2?
Since PCSX2 is a digital emulator, there’s no physical disc to insert. Instead, you load a game file (ISO) from your system.
Open PCSX2, click on System > Boot ISO, and select your game file. Make sure your PCSX2 bios is already set up, or the game will not run.
How to run PS2 games on PCSX2 emulator?
To run PS2 games on PCSX2, first make sure your PCSX2 bios is correctly configured during setup. Without BIOS, no game will work.
Then either double-click a game from your library or go to System > Boot ISO and select your file. The emulator will start the game using your current settings.
Conclusion
Getting started with PCSX2 might feel confusing at first, but once you understand how to set up the PCSX2 bios and properly add your PCSX2 games, everything becomes much easier. The key is to keep your files organized, follow the steps carefully, and make small adjustments when needed.
Now that you know how PCSX2 Emulators work, you’re ready to enjoy your favorite PS2 games on your PC without any hassle. Take your time, try a few games, and find the settings that work best for you.
If you found this guide helpful or got stuck at any step, feel free to leave a comment below. I’d love to hear your experience, answer your questions, or help you fix any issues you’re facing.